Replacement greenhouse staging was needed, with dimensions about 90 cm high, 90 cm wide and 35 cm deep. I built some using purchased wood.
Materials
The choice and cost of wood influenced the design. Champion Timber offered untreated planed redwood (Pinus sylvestris) planks at 94 mm by 15 mm at £ 9.61 a metre. B&Q offered treated rough sawn whitewood spruce (Picea abies) at 100 mm by 22 mm (the minimum thickness) at £ 3.04 a metre. It also came as ‘one by two’ (22 mm by 50 mm) ‘sticks’ at £ 2.48 per metre. A thickness of 22 mm was tolerable and the relative cost attractive, so I used the rough sawn wood.
The rough sawn wood came in 1.8 m lengths, convenient for a 90 cm width and height. I bought three 100 mm wide planks, two 125 mm wide planks and six sticks.
Design
The basic design was three, evenly-spaced, slatted shelves, comprised of planks, resting on horizontal struts between four legs.

The actual length of the planks differed, slightly, from 1,800 mm. The shortest plank, halved, determined the actual width of the staging. Other planks were cut into segments of the same length. The wider plank was centred between the narrower planks. For the second and third shelves, rectangular notches (slightly larger than the cross-section of the legs) were cut out of the four corners.
The almost-square legs of the staging would be formed by two sticks back-to-back (44 mm by 50 mm). Each leg could be cut from a single stick, with a short length remaining. That short length would also be used.
Three sets of horizontal struts could be cut from a single stick. The second longest stick (together with the longest) would determine the depth of the staging, by cutting it first into thirds and then cutting a third into two pieces, one 100 mm longer than the other. With a kerf of 2.6 mm, in practice, the depth of the staging was about 349 mm.
For the second and third shelves, the narrower planks were supported both by the horizontal struts and additional 50 mm squares cut from the remaining short lengths from the sticks and placed against the inside of the legs.
A galvanized steel cross-brace (IKEA’s “OBSERVATÖR”, £ 2) was used to increase the resistance of the final staging to any horizontal shear forces during use and reduce the risk of peel stresses on the attachment of planks to horizontal struts.
Engineering
The mechanical properties of individual pieces of wood can vary considerably. According to MatWeb, the typical mechanical properties of European spruce (based on clear – knot-free – samples) include an average density of 710 kg per cubic metre, a compressive strength of 30.0 MPa parallel to the grain and 4.10 MPa perpendicular to the grain, a shear strength of 5.30 MPa (presumably parallel to the grain), and a flexural modulus of 9.10 GPa. That is likely to be wood free of knots. The strength of PVA wood glue is greater than that of wood.
Given the shear strength of the wood, the four short sticks in the legs (with an area each of 50 mm by 250 mm), alone, can resist about 0.265 MN of downward force. That analysis ignores the ‘glue and screw’ attachment of horizontal struts to the legs. Two 50 mm squares can, alone, resist at least about 26.5 kN of downward force (ignoring the contribution of the screws).
Given the flexural modulus, the force required to bend a 100 mm wide plank by 5 mm, concentrated at the centre of the plank, would be about 362 N.
Given the average density of the wood, the weight of the staging is about 190 N.
The intended use of the staging is supporting seeds in trays and plants in pots. According to sources summarised by ABG, saturated dense soil has a weight of about 20,000 N per cubic metre. If 6 cm deep seed trays filled with that covered a shelf, they would weight about 378 N. If such trays covered all three shelves, the total weight (including that of the staging) would be about 1,324 N and the static pressure on each leg foot about 0.15 MPa. For the intended use, the staging is over-engineered.
Construction
The rough sawn timber often had one face that was better quality than the other. The poorer quality faces were placed on the underside. The planks with the best faces of all were used for the top shelf. After construction, exposed faces were sanded to avoid splinters.
The 125 mm planks were a little wider than the specification of my mitre saw (120 mm by 60 mm). Rather than use a ‘flip’ or ‘lift’ method, I finished the cut manually.
I used a jigsaw to cut the necessary notches in the 100 mm wide planks. My jigsaw’s design makes it difficult to follow the progress of the blade, so I used a jig to seek to keep the cuts straight and of the required length. (The blade strayed on early cuts, which I attributed to the blade being dull or the saw’s base having shaken loose; a fresh blade and tightening the base seemed to fix it.)
The width and thickness of the stick, although rough sawn, was measured to be broadly consistent. Care was taken that similar pieces of stick were cut to the same length, so that the staging would be square, on assembly. That was finessed with the mitre saw and by stacking four pieces of stick horizontally. It was possible to clamp the stack in such a way that was not unsafe.
Pieces were joined with PVA wood glue, clamping until it had fully cured. In addition, the horizontal struts were screwed to the legs and the planks were screwed to the horizontal struts, using two SPAX 35 mm by 3.5 mm screws at each end. The square supports were also screwed to the legs with two screws. (76 screws cost about £ 2.60.)
Result
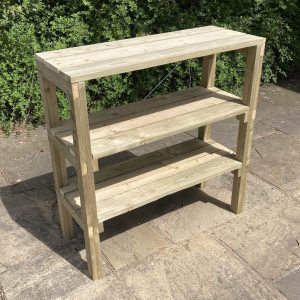
The result was as I intended. The total cost, excluding delivery of materials and the opportunity cost of labour, was about £ 65, equivalent to about £ 206/m2 of top surface area.