
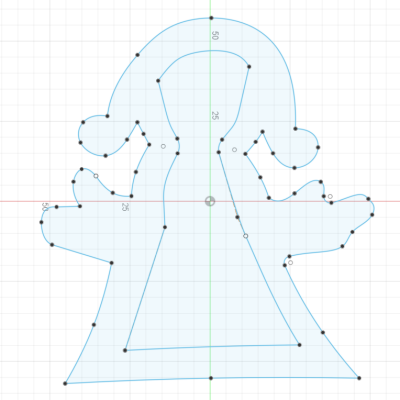
The so-called Southampton Psalter, donated to St John’s College, Cambridge, by the Earl of Southampton in 1635, but with origins in Ireland, has been dated to the 10th or 11th century. It includes a crucifixion scene with two figures above the arms of Christ, representing angels or, perhaps, the Virgin and St John.
The right hand figure was to be the inspiration for ceramic decorations. A cookie cutter was needed to cut shapes from a sheet of clay. 3D-printed PLA is not suitable for use with food, as it provides spaces that microbes can grow in, but is fine for clay. Solid PLA can be quite hard; Ultimaker says its PLA has a typical Shore D value of 83.
Tracing
I modelled the cutting profile by tracing the boundary of the figure in Autodesk’s Fusion 360 with splines. With the benefit of hindsight, given the difficulties of sweeping along certain splines, I should have used straight lines and arcs to bridge the parts of the boundary involving cusps or tight curves.
At my first attempt, I forgot that the cutter would need to be the mirror image of what was to be cut. I fixed that on my second go, shown to the left. The secret to good looking splines is to use as few control points as you can.
On my second go, I also tweaked the boundary to avoid narrow areas where excess clay could get trapped and be hard to remove.
Edging
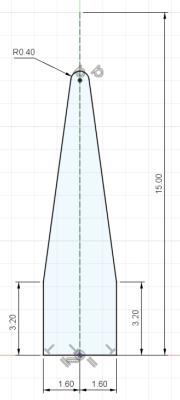
My initial plan was to extrude vertically with a taper, or to use a loft, to bring the cutting profile to a sharper edge. However, the geometry of the profile appeared to defeat Fusion 360. Ultimately, I had to extrude without a taper (by 15 mm) and apply a steep, asymmetric chamfer to the interior edge.
In a second attempt, I swept a profile of the cutting edge around the boundary. However, the geometry of the boundary also defeated Fusion 360, if one spline met another at a sharp cusp or a spline had curvature above a certain level. I later discovered that Fusion 360 is more adept at sweeping along straight lines and arcs than splines. However, with splines, I solved the problem by trial and error, tweaking the boundary at places the sweep could not cross.
I filleted the cutting edge (with a radius of 0.4 mm), which reduced its height from 15 mm. With hindsight, I could have made the edge higher (deeper) and sharper.
Stiffening
I thought the cutting profile on its own would not be rigid enough to withstand the force of being pressed into the clay. I anticipated that the force would not be applied uniformly and I did not want the curls or hands to snap off. To provide rigidity, I extruded the boundary to provide a base of thickness 3.2 mm (printing in 0.2 mm layers, that would provide a base 16 layers thick).
However, the base did not need to fill the boundary to provide the stiffness required. I used a 10 mm offset followed by some manual adjustment to exclude the centre of the base.
Slicing and printing
I saved the resulting body as an STL file and sliced it in Cura 4.6.1, specifying a layer height of 0.2 mm and, with the exception of infill density, using the default settings, such as a build plate temperature of 60°C, a printing temperature of 210°C, and a print speed of 60 mm/s. I used an infill density of 15%.
I was a little concerned about my remaining PLA filament. It had been unprotected on the reel since I had opened the packaging, almost a year ago. I knew PLA was hydroscopic and that increasing water content could spoil it. However, there were no problems in printing. Cura estimated it would take 23 g (7.85 m) of PLA and 2 hours and 7 minutes. It actually took 2 hours and 25 minutes, once the printer reached its operating temperature.
Proving the pudding
The angel cutter worked as intended. Covering the rolled clay with cling film before applying the cutter gives a rounded chamfer to the resulting piece.
